![]()
Defining Subscriptions
Create a subscription for each type of information site visitors might want to be notified about. For example, if your site sells electronics, you could set up one subscription for televisions, another for computers, and a third for stereo equipment. Site visitors can then subscribe to appropriate areas of interest.
CMS and membership users can also sign up for subscriptions.
See Also: Server Configuration
To create one or more subscriptions, follow these steps.
1. Go to Settings > Configuration > Web Alerts > Subscriptions.
2. Click Add Subscription ( ).
).
3. Enter a name for the subscription. The name should indicate the kind of information that it will cover.
4. Use the Enabled check box to indicate if the subscription is currently active.
5. Press Save ( ).
).
Effect on Custom User Properties
When you create the first subscription, a new entry is automatically created in the Custom User Properties screen. By default, its name is Subscriptions, and its type is Category. This occurs because all custom user properties appear on the Site Visitor Registration screen. In this way, users visiting that page can select areas of interest about which to be notified when content is updated.
The default name (Subscriptions) appears on the Site Visitor Registration screen. You may want to change it to something more helpful, such as Select Areas of Interest. To do this, select the Subscriptions entry and edit the Label field in the Custom User Properties screen.
The following graphic illustrates the relationship among the Subscriptions, Custom Properties, and Site Visitor Registration screens.
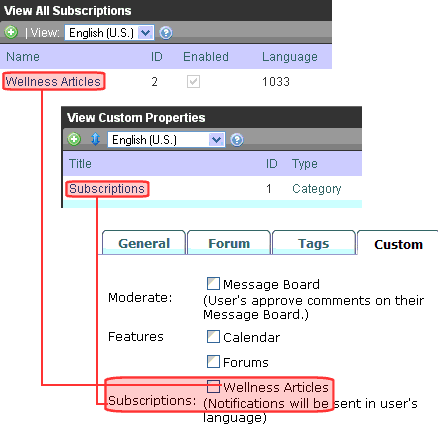
If you add more subscriptions later, they have no effect on the Subscriptions entry in the Custom User Properties screen -- that single entry covers all subscriptions.
Using Subscriptions in a Multi-Language System
When you create a subscription, a version of it is created for every enabled language in your system. You can edit the subscription name and Enabled values for any language but the ID number cannot be changed.
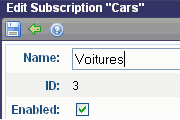
To translate any subscription, follow these steps.
1. Go to Settings > Configuration > Subscriptions.
2. From the View Languages dropdown list, select the language into which you want to translate the subscription.
3. Click the subscription that you want to translate.
4. Click Edit ( ).
).
5. Enter the translation for the subscription name. If desired, you can check or uncheck the Enabled checkbox. Only enabled subscriptions appear on the Site Visitor Registration screen.
6. Click Save ().


![]()